Vue3 - 基础
准备 nrm 配置 npm 镜像
使用淘宝镜像
创建项目 推荐官方提供的方式创建项目
1 2 3 Need to install the following packages :create-vue@3.14.0 Ok to proceed ? (y )
1 2 3 Vue.js - The Progressive JavaScript Framework ? Project name: › vue-example
1 ? Add TypeScript? › No / Yes
1 ? Add JSX Support? › No / Yes
1 ? Add Vue Router for Single Page Application development? › No / Yes
1 ? Add Pinia for state management? › No / Yes
1 ? Add Vitest for Unit Testing? › No / Yes
1 2 3 4 5 ? Add an End -to -End Testing Solution? › - Use arrow-keys. Return to submit. ❯ No Cypress Nightwatch Playwright
1 2 3 4 ? Add ESLint for code quality? › - Use arrow-keys. Return to submit. ❯ No Yes Yes , and speed up with Oxlint (experimental)
1 2 3 4 5 Done. Now run : cd vue-example npm install npm run dev
1 2 3 4 5 6 7 8 ✔ Project name: … vue-example ✔ Add TypeScript? … No / Yes ✔ Add JSX Support? … No / Yes ✔ Add Vue Router for Single Page Application development? … No / Yes ✔ Add Pinia for state management? … No / Yes ✔ Add Vitest for Unit Testing? … No / Yes ✔ Add an End-to-End Testing Solution? › No ✔ Add ESLint for code quality? › No
Vue 1 2 3 4 5 6 7 8 9 10 11 <script setup> </script> <template> </template> <style scoped> </style>
响应式变量 定义响应式变量 导入 ref 对象, 使用 ref 对象定应响应式的变量, 为初始化的变量默认值 undefined, 通过 .value 属性使用响应式变量的值
1 2 3 4 5 6 7 8 <script setup> import {ref} from "vue"; const num = ref() console.log(num.value) // undefined </script>
在 template 中使用响应式变量,直接使用变量名即可
1 2 3 <template > <h1 > {{num}}</h1 > </template >
定义响应式变量初始化 方式1 定义响应式变量的同时, 初始化变量的值
1 2 3 4 5 6 7 8 <script setup> import {ref} from "vue"; const num = ref(2) console.log(num.value) // 2 </script>
方式 2 先定义变量, 修改变量的值
1 2 3 4 5 6 7 8 9 10 <script setup> import {ref} from "vue"; const num = ref() num.value = 2 console.log(num.value) // 2 </script>
ref 对象通常用基础数据类型, 比如: 字符串、数字、布尔类型
reactive 对象用于定义复杂的数据类型, 比如: 对象
1 2 3 4 5 6 7 8 9 <script setup> import {reactive, ref} from "vue"; const userInfo = reactive({ userName: "张三", userEmail: "zhangSan@gmail.com", userPassword: "123456", userStatus: "正常", }) </script>
数据渲染 1 2 3 4 5 6 7 <template> <h1>用户信息</h1> <p><b>用户名:</b>{{userInfo.userName}}</p> <p><b>用户邮箱:</b>{{userInfo.userEmail}}</p> <p><b>用户密码:</b>{{userInfo.userPassword}}</p> <p><b>用户状态:</b>{{userInfo.userStatus}}</p> </template>
数据渲染 文本渲染 1 2 3 4 5 6 7 <template> <h1>用户信息</h1> <p><b>用户名:</b>{{userInfo.userName}}</p> <p><b>用户邮箱:</b>{{userInfo.userEmail}}</p> <p><b>用户密码:</b>{{userInfo.userPassword}}</p> <p><b>用户状态:</b>{{userInfo.userStatus}}</p> </template>
1 2 3 <template> <h1>{{num}}</h1> </template>
属性渲染 1 2 3 4 5 6 7 8 <script setup> import {ref} from "vue"; const headImgUrl = ref("https://s21.ax1x.com/2025/01/24/pEE9ToV.jpg"); const imgError = ref("哎呀,图片不见了"); const imgWidth = ref(600) </script>
1 2 3 <template> <img :width="imgWidth" :src="headImgUrl" :alt="imgError"> </template>
事件 事件定义、绑定 例子1 事件有很多,比如:
以鼠标左键点击事件为例
1 2 3 4 5 6 7 8 9 10 11 12 13 14 15 16 17 18 19 20 21 22 23 24 <script setup> import {ref} from "vue"; const num = ref(0); const jiaYi = () => { num.value = num.value + 1; } </script> <template> <h1>{{ num }} <button @click="jiaYi">+1</button> </h1> </template> <style scoped> button { width: 100px; padding: 10px; font-size: 20px; } </style>
表单 Text Password Email Radio input 输入框
1 2 3 4 5 6 7 8 9 10 11 12 13 14 15 <script setup> import {reactive} from "vue"; // 性别: 0/保密; 1/男; 2/女; const userInfo = reactive({ userName: "张三", userEmail: "zhangSan@gmail.com", userPassword: "123456", userSex: 1, userHobby: 3, userDesc: "我是个大聪明", userClass: ["math", "chinese"] }) </script>
1 2 3 4 5 6 7 8 9 10 11 <template> <label for="userName">用户名</label> <input type="text" id="userName" v-model="userInfo.userName"/> <br><br> <label for="userPassword">密 码 </label> <input type="password" id="userPassword" v-model="userInfo.userPassword"/> <br><br> <label for="userEmail">邮 箱 </label> <input type="email" id="userEmail" v-model="userInfo.userEmail"/> <br><br> </template>
单选框
1 2 3 4 5 <label for="">性 别 </label> <input id="sexMan" name="userSex" v-model="userInfo.userSex" value="1" type="radio"/><label for="sexMan">男</label> <input id="sexWoman" name="userSex" v-model="userInfo.userSex" value="2" type="radio"/><label for="sexWoman">女</label> <input id="sexSecurity" name="userSex" v-model="userInfo.userSex" value="0" type="radio"/><label for="sexSecurity">保密</label> <br><br>
多选框
1 2 3 4 5 <label for="">选 课 </label> <input id="math" v-model="userInfo.userClass" name="userClass" type="checkbox" value="math"><label for="math">数学</label> <input id="english" v-model="userInfo.userClass" name="userClass" type="checkbox" value="english"><label for="english">英语</label> <input id="chinese" v-model="userInfo.userClass" name="userClass" type="checkbox" value="chinese"><label for="chinese">语文</label> <br><br>
下拉选择框
1 2 3 4 5 6 7 8 9 <label for="">兴趣爱好</label> <select name="userHobby" v-model="userInfo.userHobby"> <option value="0">--请选择兴趣爱好--</option> <option value="1">羽毛球</option> <option value="2">乒乓球</option> <option value="3">台球</option> <option value="4">远足</option> </select> <br><br>
文本域
1 2 <label for="">个人简介</label> <textarea v-model="userInfo.userDesc" name="" cols="50" rows="10"></textarea>
条件渲染 不同的等级显示不同的颜色
1 2 3 4 5 6 7 8 9 10 11 12 13 14 15 16 17 18 <script setup> import {reactive} from "vue"; // 性别: 0/保密; 1/男; 2/女; // 用户等级: 1 2 3 4 5 6 7 // 颜色 红 橙 黄 绿 青 蓝 紫 const userInfo = reactive({ userName: "张三", userEmail: "zhangSan@gmail.com", userPassword: "123456", userSex: 1, userHobby: 3, userDesc: "我是个大聪明", userClass: ["math", "chinese"], userLevel: 5, }) </script>
1 2 3 4 5 6 7 8 <span v-if="userInfo.userLevel === 1" style="color: red">VIP{{userInfo.userLevel}}</span> <span v-else-if="userInfo.userLevel === 2" style="color: orange">VIP{{userInfo.userLevel}}</span> <span v-else-if="userInfo.userLevel === 3" style="color: yellow">VIP{{userInfo.userLevel}}</span> <span v-else-if="userInfo.userLevel === 4" style="color: green">VIP{{userInfo.userLevel}}</span> <span v-else-if="userInfo.userLevel === 5" style="color: cyan">VIP{{userInfo.userLevel}}</span> <span v-else-if="userInfo.userLevel === 6" style="color: blue">VIP{{userInfo.userLevel}}</span> <span v-else-if="userInfo.userLevel === 7" style="color: purple">VIP{{userInfo.userLevel}}</span> <span v-else><b>VIP{{userInfo.userLevel}}</b></span>
列表渲染 1 2 3 4 <script setup> import {reactive, ref} from "vue"; const userHobbyList = ref(["--请选择兴趣爱好--","羽毛球", "乒乓球", "台球", "远足"]) </script>
1 2 3 4 <label for="">兴趣爱好</label> <select name="userHobby"> <option v-for="(item, index) in userHobbyList" :value="index">{{item}}</option> </select>
样式绑定 样式绑定灵活复杂, 应用中再研究
https://cn.vuejs.org/guide/essentials/class-and-style.html
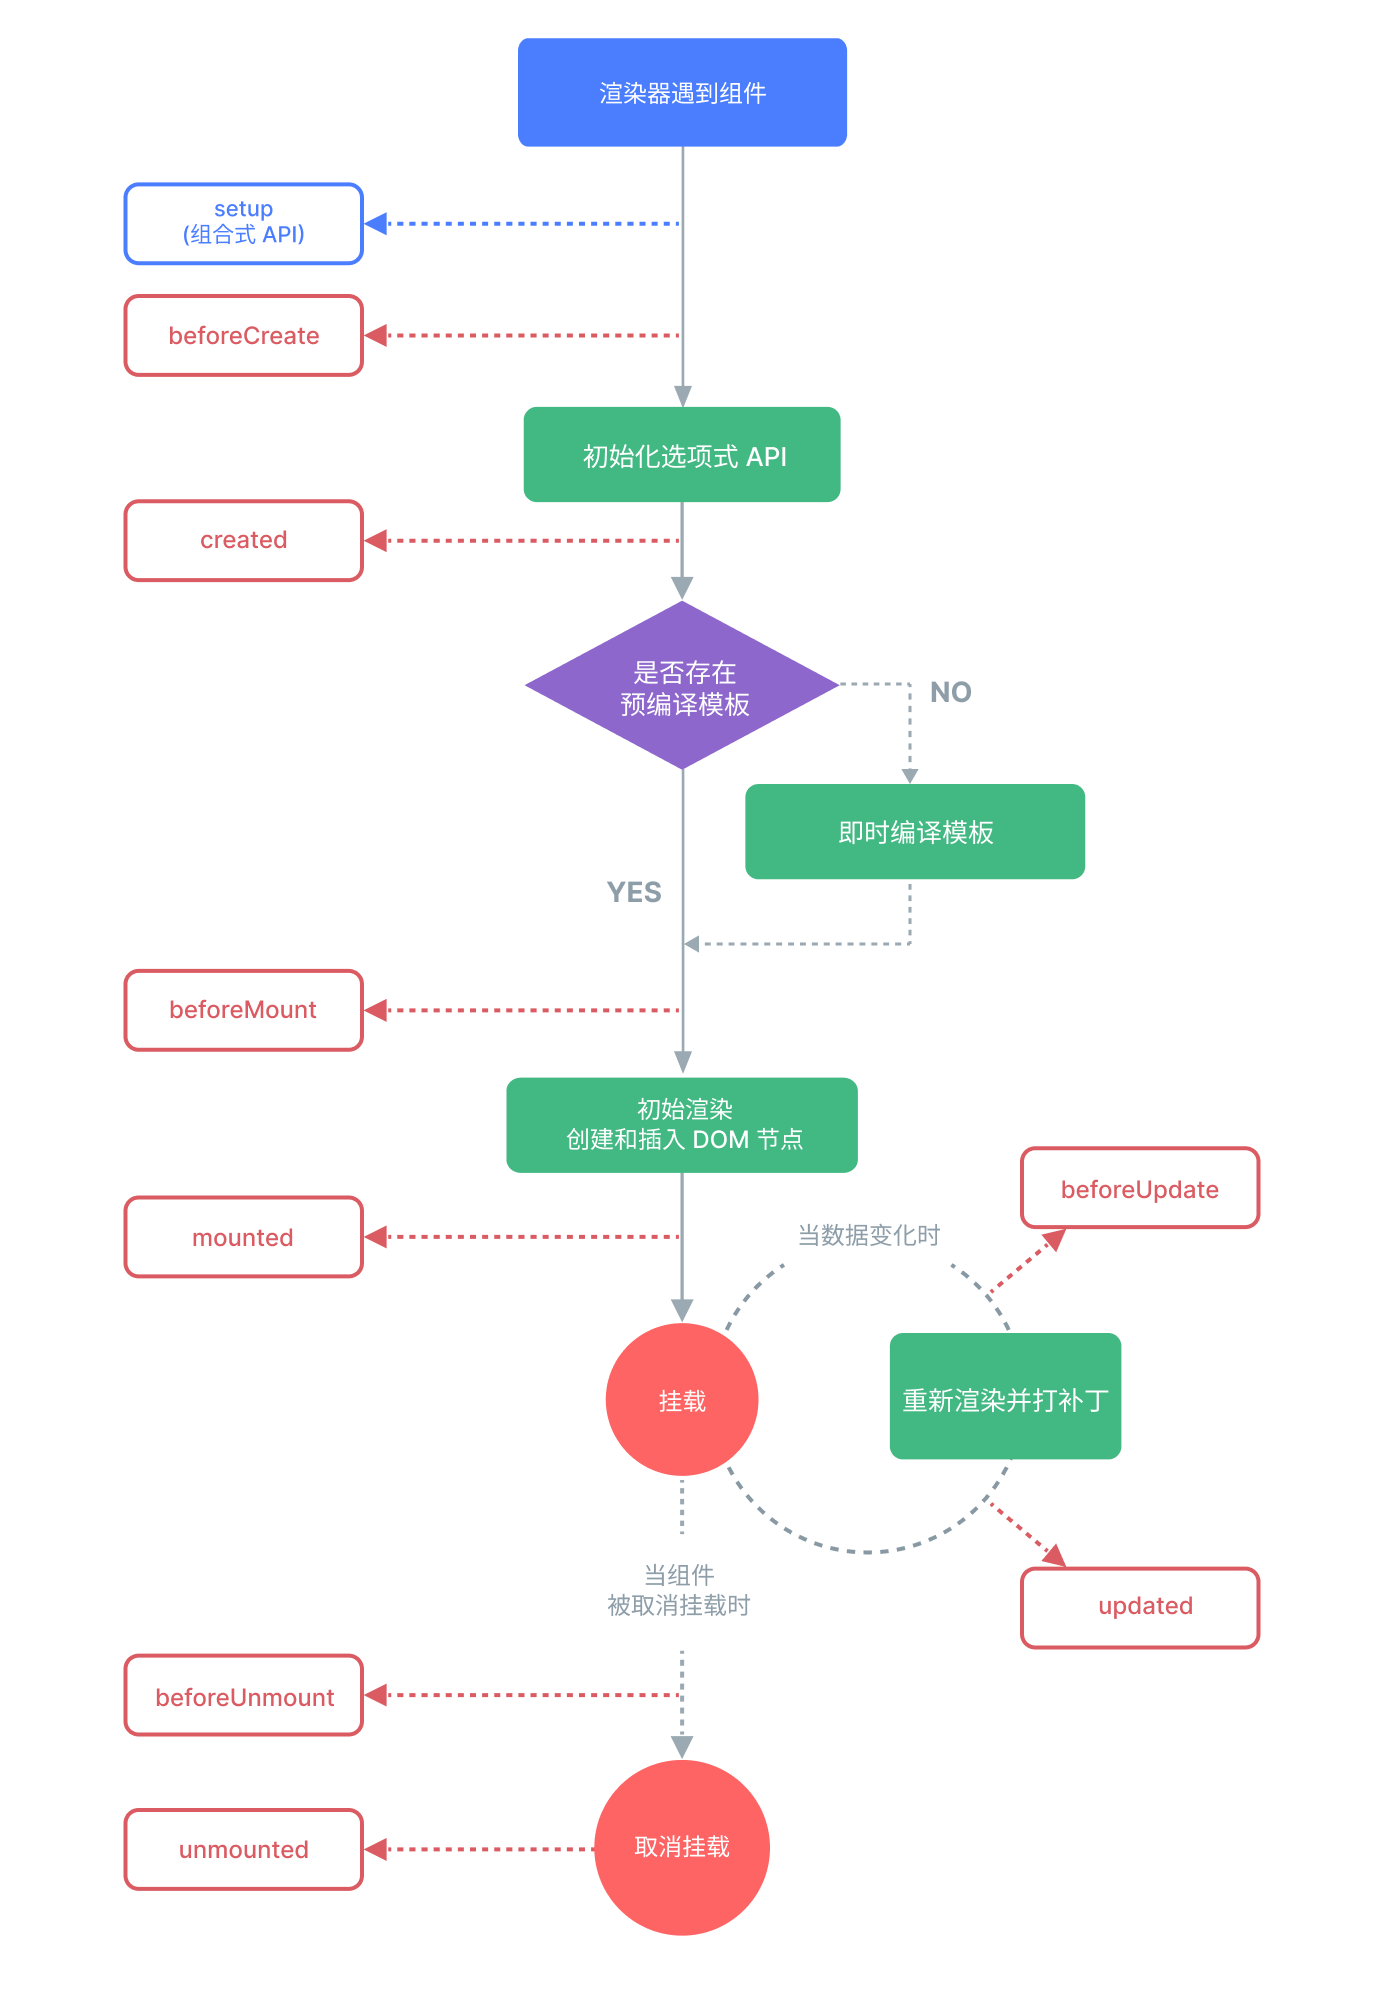
生命周期函数
注册生命周期函数
1 2 3 4 5 6 7 <script setup> import { onMounted } from 'vue' onMounted(() => { console.log(`the component is now mounted.`) }) </script>
路由 路由定义不同的地址跳转到不同的页面
页面本身是 .vue 文件, 通常放在 src/views 目录下, 比如:
首页(IndexView.vue)
我的 (HomeView.vue)
登录 (LoginView.vue)
1 2 3 4 5 6 7 8 9 10 11 <script setup> </script> <template> <h1>个人中心</h1> </template> <style scoped> </style>
1 2 3 4 5 6 7 8 9 10 11 <script setup> </script> <template> <h1>首页</h1> </template> <style scoped> </style>
1 2 3 4 5 6 7 8 9 10 11 <script setup> </script> <template> <h1>登录页面</h1> </template> <style scoped> </style>
路由定义在 src/router/index.js 文件
1 2 3 4 5 6 7 8 9 10 11 12 13 14 15 16 17 18 19 20 21 22 23 24 25 import {createRouter, createWebHistory} from 'vue-router' import IndexView from '../views/IndexView.vue' import LoginView from "@/views/LoginView.vue" ;const router = createRouter ({ history : createWebHistory (import .meta .env .BASE_URL ), routes : [ { path : '/index' , name : 'index' , component : IndexView , }, { path : '/login' , name : 'login' , component : LoginView , }, { path : '/home' , name : 'home' , component :import ('@/views/HomeView.vue' ), }, ], })export default router
组件 组件同页面一样, 本质其实就是 .vue 文件, 通常放在 src/components 目录下
页面和组件区别:
页面: 一般情况下, 不可复用
组件: 可以重复使用,开发中,我们会把常用的功能封装成组件, 比如: 按钮、模态框、表单等
比如 按钮, 组件名 ColorButton